LiteSwitch UI Workflow Guide
This document will help you navigate and utilize the LiteSwitch platform effectively.
Overview
LiteSwitch is a traffic shaping solution for Suppliers that maximizes value of QPS allocations on direct connections with Buyer partners. Leveraging machine learning, LiteSwitch provides distribution recommendations for outbound request traffic, identifying optimal traffic mix per Buyer connection in real-time.
To set up your account and implement traffic shaping for specific connections, please navigate to LiteSwitch at https://lsw.bidswitch.com/.
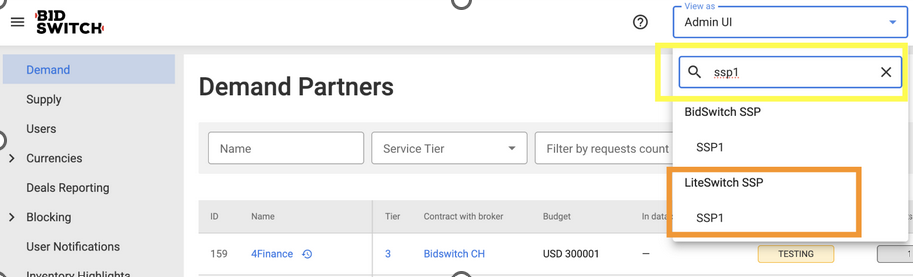
Setting Up Your Account | General Settings
Account Selection.
Use the dropdown list in the top right corner of the page to select your LiteSwitch account instead of BidSwitch which loads by default.
Navigate to the page by choosing it on the left side menu.
Set up Buyer connections for traffic shaping.
QPS Limits: Establish QPS limits for each Buyer. Only set QPS limits if provided by the Buyer to avoid unnecessary filtration level increases. By default, QPS are unlimited for every Buyer partner. Shaping can be enabled/disabled for each partner at any time.
DSP ID should be your internal Buyer ID, the same that will be sent to LiteSwitch in the
wseatfield of the bid request and as Buyer ID in the impression calls.QPS is allocated separately per Buyer connection at every datacenter. Use the Bulk QPS Limits Upload function on the right to adjust QPS settings for multiple connections.
Save Changes: Always use the Save SSP button to apply any changes.
Datacenters
Copy the endpoint: Navigate to the Datacenters section to copy the endpoint where you’ll need to send traffic for the model workout.
Control QPS Limits: Control QPS limits per datacenter and enable/disable existing datacenters if you have more than one. Inform the LiteSwitch team when you’re about to launch a new datacenter for the LiteSwitch instance.
Setting Filtration Rules | Targeting Groups
Navigate to the panel by choosing it on the left side menu.
Set filtration rules and customize filtration levels for each connection and partner. For example, you can target CTV traffic on specific Buyers or adjust filtration levels for different partners as needed.
Targeting Groups:
Targeting Group List: Find a list of targeting groups. There can be multiple targeting groups per DSP partner. At least one targeting group must always be active. Note that the last active Targeting Group associated with a particular DSP cannot be disabled; the switch will be greyed-out. By default, the shaping level is set to 0% per targeting group.
Restrict shaping: Restrict shaping for selected types of traffic via an existing Targeting Group or by creating a new one.
Creating a new Targeting Group:
Step 1: Input general settings such as Name, traffic type, auction type, and applicable DSP (just one).
Step 2: Choose targeting from the list: geo, language, supply chain object, device type, ad type, interstitial, etc.
Step 3: Platform settings to select from 2 inventory types: In-app / Website targeting.
Step 4: Choose optimal Performance settings for this targeting group, including setting optimal filtration levels. The system requires at least 24 hours of trading data to analyze performance and suggest optimal filtration levels.
Review Applied Rules:
Targeting Lists: Go back to the targeting lists and see all applied rules from the main page.
Track Results | Reporting Tab
Navigate to the tab by choosing it on the left side menu. It contains two tabs: LiteSwitch reporting and .
Both reports can switch dimensions, allowing data to be split by the following keys:
DSP ID
Device Type
Content Type
Inventory Type
Country
Performance Reports Metrics:
Bid Request Filtering Rate: Percentage of filtered requests vs. total number of evaluated bid opportunities.
Impressions: Number of impressions delivered on the processed traffic.
Impressions Reduced: Number of filtered-out impressions determined based on the learning dataset.
Media Cost: Cost of media for the processed requests.
Media Reduced: Cost of media filtered out during the recommendation process. Calculated by extrapolating the cost from the learning dataset to the full traffic volume.
Recommendations: Number of Bid requests recommended for distribution.
General Trading Report Metrics:
Bid Requests: Total bid requests received.
Media Cost: Cost of media for the bid requests.
Yes Bids: Number of bids that were accepted.
Impressions: Number of impressions delivered.
eCPM: Effective cost per thousand impressions.
Win Rate: Percentage of bids that won.
Download the report:
Download the report in CSV for easy analysis.